


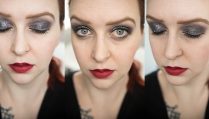
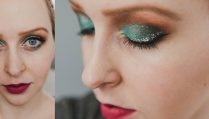
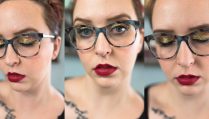


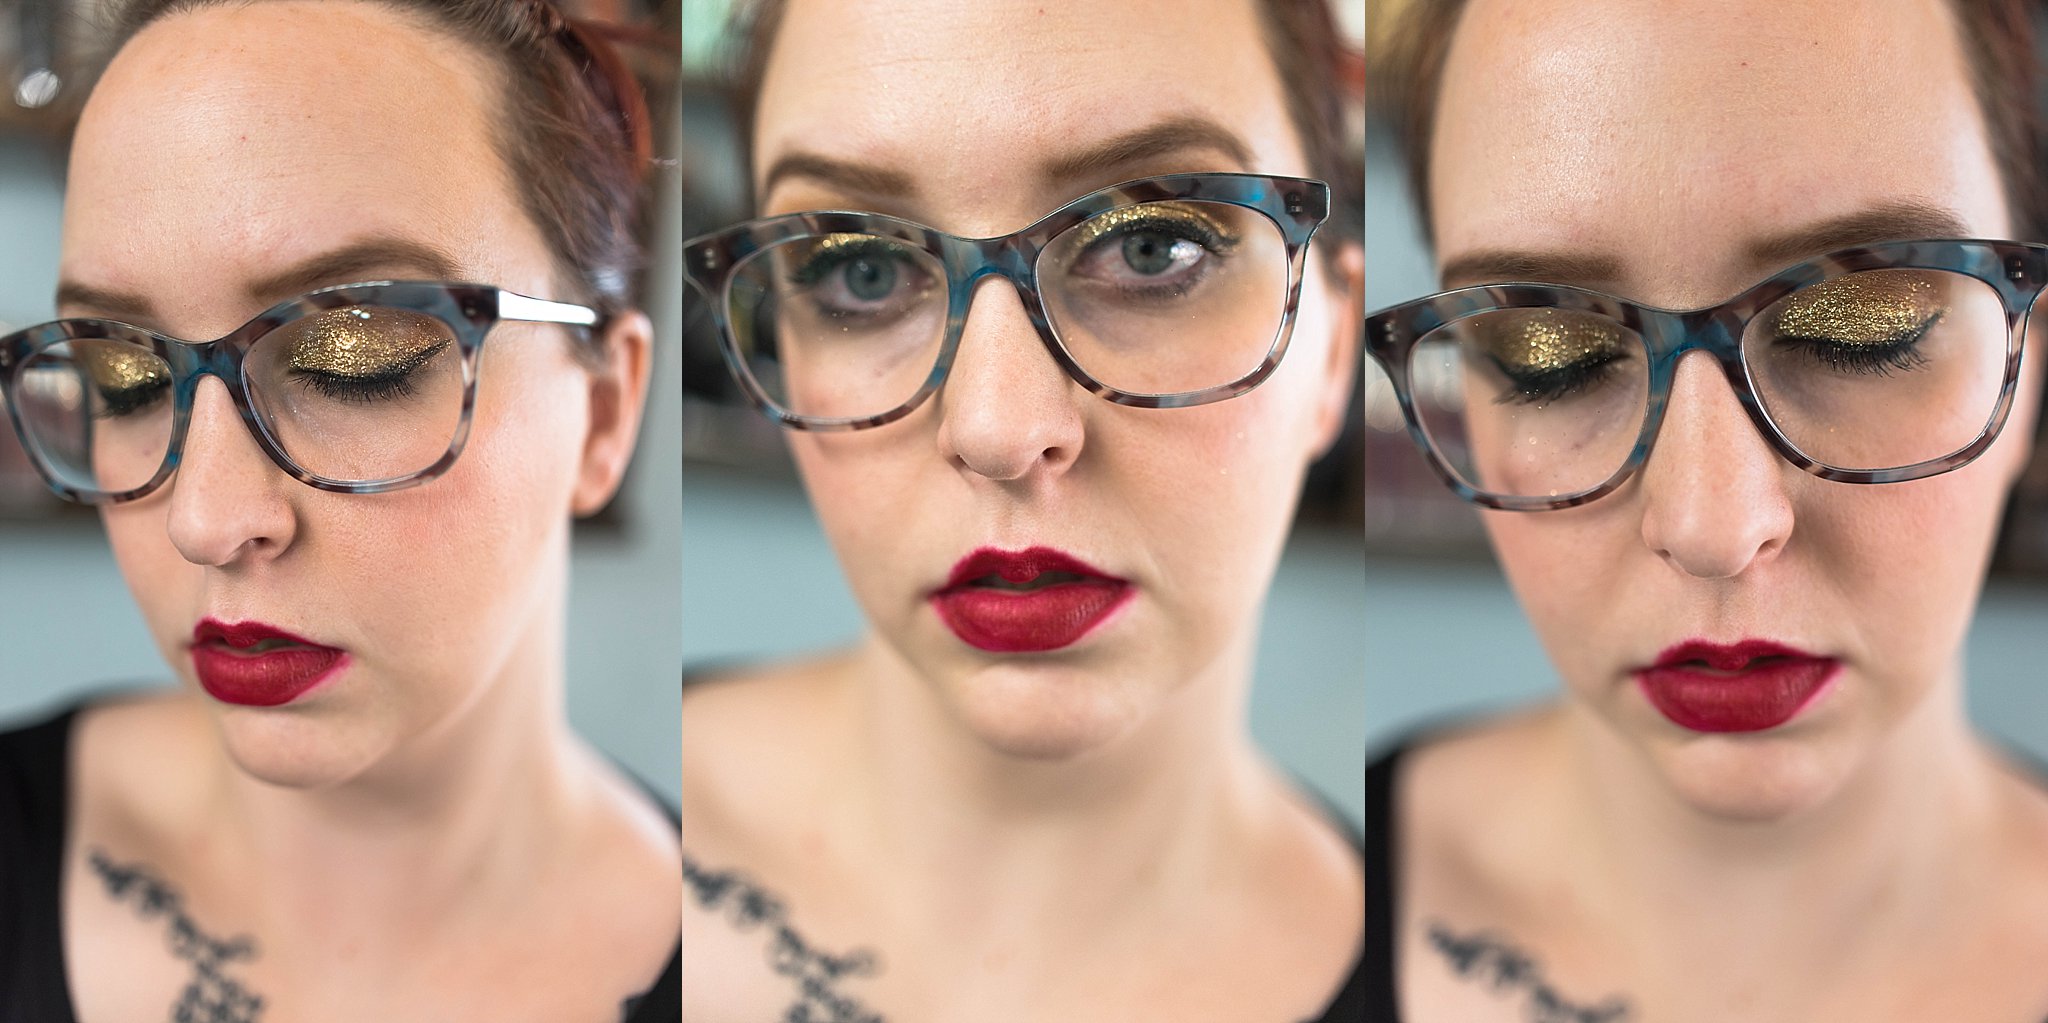
Glitter eyes are so, so fun and gorgeous, and are surprisingly easy! Looks that I can do while wearing a baby are must haves for me, with 3 kids under 1.5 years old I’m almost always wearing or holding one as I get ready. And, once you go glitter you’ll have an obsession and not want to go back, so be prepared.
For the glitter eyes all I do first is my eyebrows, the rest of my face (highlight, contour, illuminator) is done after my eyes are done, as glitter can get everywhere and I don’t want it to mess up my makeup by having it done first. First, you’ll need your eyeshadow primer. I use this Urban Decay Eyeshadow Primer. Your eyeshadow colors will go on much smoother and more pigmented when you prime your eyes, as well as not creasing throughout the day. A little goes a long way, so this little tube should last you a while.

Once you’ve primed your eyes you’ll want to grab your eyeshadow palette. I used the Morphe Jaclyn Hill palette for my glitter eyes. This palette has absolutely beautiful colors, and is quickly becoming one of my favorites. It’s also insanely reasonably priced while still being great quality.

I used my Mascara eyeshadow blush to apply my eyeshadow, using the fat end. Then, I applied my lightest color to my eye lid, and just above my crease.

Then, I used the yellow color in the palette, still using the fat end of the brush, and applied that color to my lid only. You can go darker or lighter by using more or less product. You’ll be covering it with glitter so this is very forgiving and you don’t need your eyeshadow to look perfect.

Then, you’ll take the small end of your brush and use one of your contrast colors. I use two, so here I use the lighter of the two. I start by making a V in the corner of my eye, then I use the fat end of my eyeshadow brush to blend in. I don’t blend out because I don’t want the eyeshadow to go out further than my eye by much, so that’s why I blend in. You can add more of the dark as needed – I prefer to start with less and work my way up to more.

Once you have your transition color down and how you like you will need to grab your NYX Glitter Primer. A little goes a long way with this as well. You can either apply it to your finger and then pat it onto your eye lid, or directly onto your eyelid and use your finger to distribute it. I only apply this to my eyelid up to my crease, as that’s where the glitter will go.

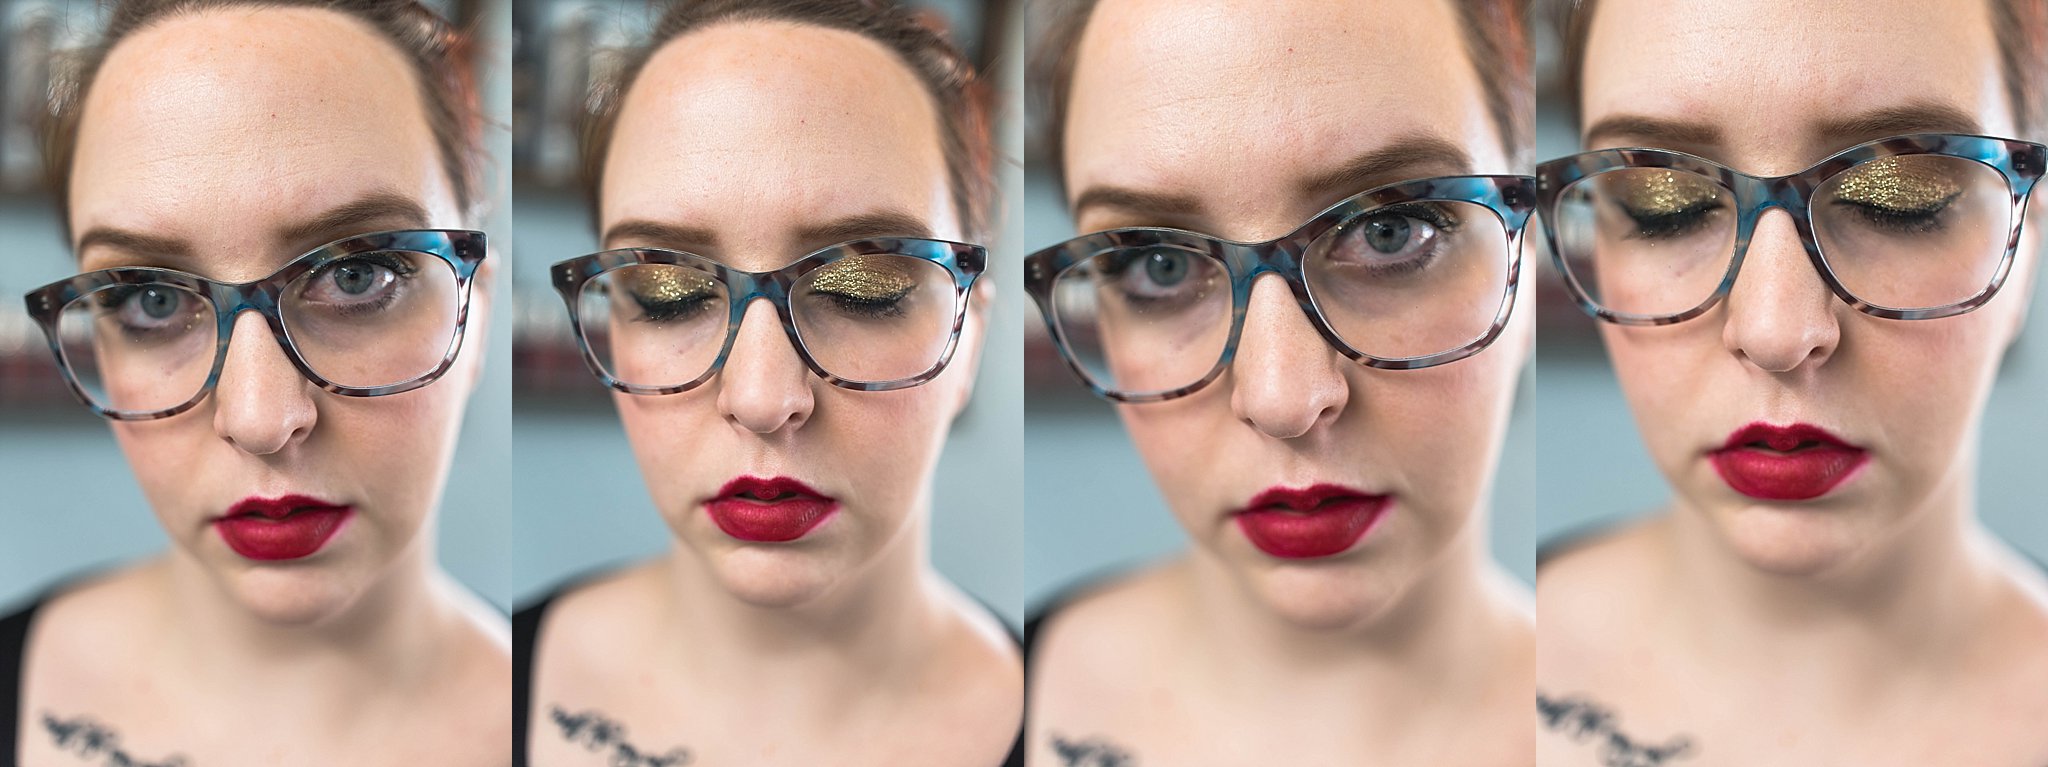
Now, you need your NYX glitter. They have so many options, but here I used their gold. I shake some glitter into the lid, and will use my brush to pick up the glitter from there.

I used my NYX Pro Detail brush, and I dipped in into the lid with the glitter. I make almost a scooping motion, and scoop glitter up onto the brush, then apply it to my eye. You can use as much glitter as you want.

I had to re-dip numerous times to get the amount, and look, of glitter that I wanted. Once you’re done using your brush for glitter you’ll want to wash it to make sure any adhesive doesn’t stay on it and ruin it. I just clean it with a make up remover wipe, then I wash it with brush cleaner when I was the rest of my brushes once a week.

Next, I use my liquid eyeliner from Limelight. I’ve used others, but I love how fine this one is, and how long it lasts. I do use other brands for other colors since Limelight only offers black, but they are my go to otherwise.

I used my fingers to pull my eye lid out to get rid of creases, then I started at my inner eye, and slowly lined my lid, getting as close to the lashes as I could. Then, I drew it out past the edge of my eye to accomplish a winged look. I drew one line out, then I drew a line above that one and fill in the space. You can make them fatter or thinner, it all depends on your preference.

Once my eyeliner is done it’s time to add the mascara. You could do this now, or if you wanted to wait until you’re done with all of your makeup you can do that. I use the Perversion Mascara from Urban Decay.

Then, I decided I wanted my eyes to pop a little more, so I decided to do another, darker, transition color. Again I took the small end of my eyeshadow brush and applied the color to the top of the crease in a small, thin line. Then, use the fat end of your brush to blend in, and up a bit. You have glitter on, so you don’t want to blend down as you’ll knock of the glitter.

You could do this step before applying the glitter as well, it all is up to you. For me, I didn’t see that I needed another transition color until after having the glitter applied.

Then, you do the rest of your makeup. I use Maskcara makeup. First I apply my contour to my forehead, by my nose, and under my chin. I use walnut for my contour.

Then, apply your highlight. You will apply this to the bridge of your nose, your forehead below your contour, under your eyes and on your cheeks and chin.

Once I’ve applied that I get my perfector damp and I dab my makeup to blend. Rubbing will just rub it all of, so be sure to dab.

Then, it’s time for cheek contour and blush. I again use walnut for my contour, and I take the fat end of my 30 second detail hack brush and apply the contour to my cheek. Then, I grab my blush and apply it to the apples of my cheeks. I use different brush colors all the time, but for this look I used pink grapefruit. Once the blush and contour have been applied I use the fat end of my 30 second hac brush and blend them, in a circle. I start at the top with my blush, and once I’ve blended that I blend my contour, and I blend it up into my blush.

Then, as I’m very, very pasty I use the Cayman bronzer to set in my contour. I use the skinny end of the B Squared Bronzer and Brush blush and lightly apply bronzer to where I put my contour, except for under my chin.

Then, I use the fat end of that same brush and set the rest of my makeup in with my Vanilla Dust powder. I blend it all in, as well as the bronzer as I’m using this brush.

Once that’s done I use a setting spray to set in my makeup, I use both Mascara’s setting spray and Mac’s. The one I’m using from Mac you can find here. I spray my face until it’s damp, making sure I got all over, then I wait a minute or two to let it dry.

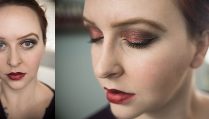
And, the finishing touch – lips. For this look I used Limelight’s Enduring lip color in Cherry Pie. This color dries matte, and stays on so well. Before applying I put on chapstick and give my lips a few minutes to soak it in first.

I use the applicator and line my lips, then I fill them in. This keeps my lines cleaner, which makes a big difference when you’re using a color this dark – it’s less forgiving when you try to clean up your lines after.

And, whalah, you’re done! You have your gorgeous glitter eyes done, and have some bold, dramatic color on your lips to even it all out.


Comments